Today marks an important milestone — I’m blogging about a JavaScript library!
Ever since I took a deep-dive JavaScript boot camp a few months ago, I’ve been eager to start a project that would let me hone my newly-acquired skills. To that end, I’ve been refactoring ProjectNom’s (poorly-coded) JavaScript so that it conforms to best practices.
That’s low-hanging fruit though. What I really wanted to sink my teeth into was something like AngularJS — a modern JavaScript framework that takes the language to another level, opening up entirely new ways of rendering a website (e.g. SPA).
But the problem with Angular is that it’s a full MVC framework, and an opinionated one at that. To truly get the most out of it, I’d have to build ProjectNom from scratch – which I had just finished doing for other reasons, and didn’t want to do again so soon.
At work, it has been proposed that we use ReactJS for any front-end development so that components could be shared and re-used across projects. I didn’t know anything about React except the name, so when I had some free time, I decided to research it.
I started to get really excited. Not only did the philosophy of the framework sound right up my alley, but it was also designed in such a way that it could slot easily into an existing project. After a tutorial or two, I made the decision to take it for a spin on ProjectNom. What follows are my experiences and takeaways as I moved from the perfect world of tutorials to a real world use case.
To be clear, this post is not a tutorial. There are many of those already, including on React’s own website. I include a quick introduction to the theory of React in the next section, but after that I will assume you know the basics of how React works so that we can dig a little deeper.
So what is React?
Let’s imagine for a moment that standard HTML elements — div, ul, input, etc — are like LEGO bricks. They each have a function and purpose; but, on their own, they aren’t very interesting or useful.
React gives us a way to define components. A React component is like a LEGO set – it specifies the pieces and assembly instructions to create an interesting, complex object. It’s easy to define your own component, but there are also a large number of ready-made React components available. Either way, once a component is defined, all you have to do is ask React for it, and it’s ready to use on a web page.
Of course, a static collection of HTML elements is only slightly more interesting than a single HTML element. Most web pages are driven by the data that flows through it, and that’s where React’s power is fully realized. Each React component contains a state and this state defines how the component should look or behave. You can specify an initial state when you first ask React for a component, but that state can be modified at any time in response to new data. You could think of it like a LEGO set that specifies exactly which minifigs should go where, but providing the flexibility to move them around later.
If this sounds as interesting to you as it does to me, then I encourage you to check out a tutorial or two. Feel free to come back here once you understand the basics.
But first, a note about JSX
Perhaps the biggest WTF moment I had while researching React was when I came across their JavaScript language extension called JSX. Since React lets you build complex components out of simple HTML elements, the need to express an HTML layout becomes important. JSX attempts to make that easier:
var CommentBox = React.createClass({
   render: function() {
     return (
       <div className="commentBox">
         Hello, world! I am a CommentBox.
       </div>
     );
   }
});
Yep, that’s HTML1 hanging out in the middle of some otherwise normal JavaScript code. It seemed unnatural, out of place and ugly. So, because JSX is optional, I opted to use the pure JavaScript alternative:
var CommentBox = React.createClass({
   render: function() {
     return React.DOM.div(
        {className: "commentBox"},
        "Hello, world! I am a CommentBox."
     );
   }
});
But as my components became more complex, I realized it was getting harder to see how the elements were related to each other. This is where JSX shines: HTML naturally exposes relationships and hierarchy.
That being said, I’m still unsure about JSX. The engineer side of me gravitates toward pure code and, as you’ll see in the code samples below, I persisted with that philosophy. But, I encourage you to consider how the same code would look in JSX and decide which syntax you prefer.
1 Technically it’s not exactly HTML, but for the purposes of this discussion, it’s close enough.
The Keeper of State
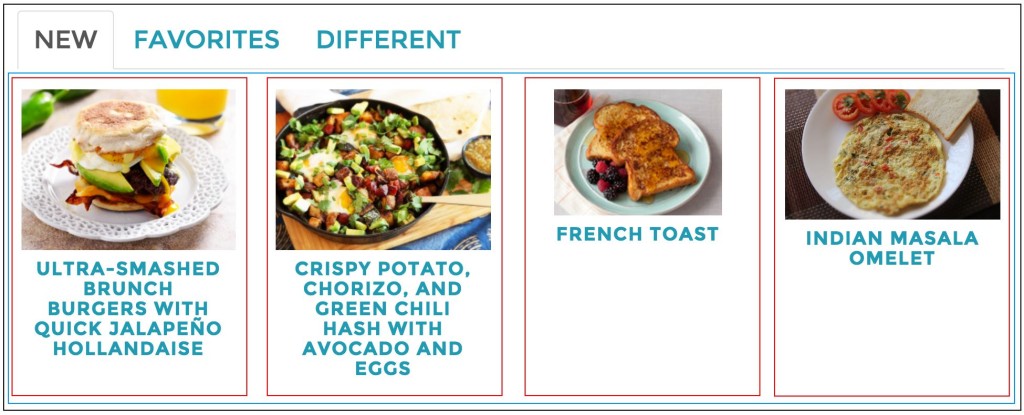
This is the feature that I wanted to (re)create in React:

These tabs are the first thing you see after logging in to ProjectNom, and help surface recipes that you might be interested in. It was one of the first things I made in ProjectNom and I’ve been wanting to update it for a while.
So, the first thing we need to decide is how this feature translates into React components. In theory, the whole thing could be one large component, but let’s consider one of the advantages of having components in the first place: reusability2. The larger and more specialized you make a component, the less likely you’ll be able to reuse it. But small, generic pieces might have a use elsewhere on the site. For example:
Each colored box represents a different component. So:
- Red are individual recipe summaries. They take in a JSON object describing a recipe, and produce markup that displays some of the basic information.
- Blue is a recipe group. It takes in a JSON array of recipe objects, and creates a recipe summary (red) for each one.
- Black is a recipe tab group. It takes in a set of API endpoints, and creates a tab for each endpoint. It also creates a recipe group (blue), passing the data returned from the API to it.
While breaking up a UI into discrete components isn’t a particularly new or groundbreaking practice, it’s worth spelling out here so that you can see how multiple components can be combined to build new functionality. It also guides our discussion of state.
Every component can have state — data that changes in response to user interaction. React recommends that data flow down from the lowest common denominator; or, in other words, the top-most component in a hierarchy should manage the state for every component nested inside of it.
Okay, so given all this information, we can safely say that our state should live at the recipe tab group — it is the lowest common component. Any state changes at the recipe tab level will flow down to our recipe group and recipes, refreshing the display as needed.
Or, more concretely:
var recipeTabGroup = React.createClass({
	getInitialState: function() {
		return {
			tabs: [
				{
					name: "New",
					endpoint: "/api/1/recipes/recent",
					data: [],
					loaded: false
				},
				{
					name: "Favorites",
					endpoint: "/api/1/recipes/favorite",
					data: [],
					loaded: false
				},
				{
					name: "Different",
					endpoint: "/api/1/recipes/different",
					data: [],
					loaded: false
				}
			]
		};
	},

	componentDidMount: function() {
		this.state.tabs.map(function loadTabs(tab) {
			ajaxGet(tab.endpoint, null)
				.done(function(data)
				{
					// Update State
				}.bind(this));
		}.bind(this));
	},

	render: function() {
		// Build our tabs
		var tabs = this.state.tabs.map(function getTabs(tab) {
			var t = tab.name.toLowerCase();
			return React.DOM.li({role: "presentation", key: t},
				React.DOM.a({href: "#" + t, "aria-controls": t, role: "tab", "data-toggle": "tab", id: "tab" + tab.name}, tab.name));
		});
		var tabList = React.DOM.ul({className: "nav nav-tabs", role: "tablist", id: "tabs"}, tabs);

		// Build the content for our tabs
		var tabpanels = this.state.tabs.map(function getTabPanels(tab) {
			var t = tab.name.toLowerCase();
			return React.DOM.div({className: "tab-pane content-pane", id: t, key: t, role: "tabpanel"},
				// RecipeGroup is another React component defined elsewhere.
				React.createElement(RecipeGroup, {recipes: tab.data, loaded: tab.loaded}));
		});
		var tabContent = React.DOM.div({className: "tab-content"}, tabpanels);

		// Put it all together
		return React.DOM.div({className: "tabpanel"}, tabList, tabContent);
	}
});
But now we have a problem. When a page containing our new component loads, we can deduce that the following steps take place:
- Component loads with default state. In our case, this means a list of tabs (and API endpoints) are defined, but no data has been retrieved.3
- Component renders with its default state.
- Component fires off AJAX requests to each API endpoint.
- State is updated with data received.
- Component re-renders, sending this new data down to lower components so that they can also re-render with this new data.
Do you see the problem? You probably noticed that we have one state object which defines all of our tabs. We fire off AJAX calls for each tab but — when do we get the results? Our AJAX promises could resolve at any time, and each one needs to update our single state object. If we blindly call setState in one callback, it might overwrite information just written by another callback.
After some research4, I found out that setState has an alternative form which takes a callback instead of a new state object. This callback is guaranteed to happen atomically so we can be assured that one update to state will happen in isolation and won’t clobber an update being made in another callback. The result is something like this:
componentDidMount: function() {
	this.state.tabs.map(function loadTabs(tab) {
		ajaxGet(tab.endpoint, null)
			.done(function(data)
			{
				this.setState(function modifyState(oldState) {
					/*
					Using oldState as a template, return a new
					state updated with the information just received.
					*/
				});
			}.bind(this));
	}.bind(this));
}
2 Other advantages: maintainablity, unit testing, separation of concerns.
3 The code snippet shows the tabs and endpoints hardcoded into the component, but we could also imagine this information being passed in dynamically.
4 Credit to: https://kevinmccarthy.org/2015/07/05/multiple-async-callbacks-updating-state-in-react/
Go with the flow
I wanted to back up for a moment and address something I glossed over in the previous section. React works best when state data flows down through components — but what if a component lower down in the hierarchy wants to change state?
The idea is to use callbacks. You can pass a callback function from the component that holds state down to nested components, which would then call it whenever they need to mutate state.
Okay, so what if completely unrelated components need to talk to each other? In theory, everything should be data driven; but, if that’s not the case, then you can use events. For example, you could create a global event for components to subscribe to. Whenever a component needs to send a message to other components, it can trigger that event.
Technically we’re no longer talking about React at this point. This is all recommended practice, and falls into the category of Facebook’s Flux pattern. Even so, Flux was designed with React in mind, and I will be sticking to this pattern as much as possible as I expand my use of React. I’ll update this post with additional thoughts as I do so; in the meantime, check out this post for a deeper discussion on how to communicate between components.
HTML Markup in React
Whether you use JSX or the createElement JavaScript equivalent, defining HTML markup in React is easy and straightforward. But there is one disadvantage: until it is rendered to the browser, it is locked up in React. Want to manipulate the markup or inject it into another framework? Too bad.
For me, this issue came up when trying to integrate with Bootstrap. I was able to find a workaround, but it’s worth noting that React’s spiffy markup generation tools can’t be used directly with other libraries or frameworks.
The Case for Gulp (or any other task runner)
Up until recently, I had never used a task runner. There are a number of reasons for this, but primarily it was because I had no need for JavaScript transpilers or CSS preprocessors5. But React quickly started to force my hand on this.
First of all, there’s JSX. As I mentioned earlier, I opted not to use JSX; but, if you do decide to take advantage of it, then you’ll need a transpiler to convert your JSX code into pure JavaScript that the browser can understand. (And, yes, if I’m being completely honest, part of my reason to avoid JSX was so that I didn’t need to set up a transpiler.)
Second of all, there is the question of how you include React itself in your project. One option is to download the .js and .min.js directly from the React website, and just include those in <script> tags on your site. A better option is to use npm so that your code repository isn’t bloated with third-party (and potentially outdated) dependencies.
But — speaking as a newcomer to JavaScript — npm is weird. Or rather, it doesn’t integrate seamlessly with a web project. It places all dependencies in a node_modules folder, but it’s not exactly clear what you do after that. Do you include the node_modules folder when you deploy your website, and link directly to dependencies in there? Do you copy your dependencies out of node_modules and into a common folder such as /js/lib? Or something else? As I researched, it became clear that no matter what path you go down, a task runner is all but required to make npm work as intended.
There are two popular task runners in use these days, Grunt and Gulp. I chose Gulp primarily because it is configured with code rather than a JSON object. So let’s talk about how this shiny new task runner solves our dependency problem.
I mentioned earlier that the appeal of React is its components, and the promise of reusability. But how exactly do you reuse a component? In my pre-task runner mindset, I reasoned that components would be placed in separate .js files, and that you would simply include those files in <script> tags when they’re needed. For ProjectNom, I dynamically create my <script> tags in PHP footer templates; but including component dependencies there felt wrong, and a violation of SoC.
That’s when I stumbled upon Browserify. The core functionality of Browserify is that it lets you use Node.js require syntax in browsers. What does that mean exactly? Well, let’s take a look at the first few lines of a JavaScript where I use our new recipe tabs component:
var pnHome = (function($) {
	var React = require("react");
	var ReactDOM = require("react-dom");

	// Custom React Component
	var RecipeTabs = require("components/RecipeTabs.js");

	function initPage()
	{
		ReactDOM.render(
		  React.createElement(RecipeTabs),
		  document.getElementById('recipeTabs')
		);
	}

	return {
		init: initPage
	};

	// ...Other code...
})(jQuery);
Those require statements aren’t valid syntax for browser JavaScript, but they make sense logically: I’m using React and my RecipeTabs component, so I require them here. Browserify parses these require statements and spits out a JavaScript file that’s valid for a browser6.
In Gulp, you would configure this voodoo like so:
var gulp = require('gulp'),
	browserify = require("browserify"),
	source = require("vinyl-source-stream");

gulp.task('browserify', function() {
  return browserify('./src/home.js')
  .bundle()
  .pipe(source('home.js'))
  .pipe(gulp.dest('./js/'));
});
This task takes the JavaScript file located at ./src/home.js, runs Browserify on it, and outputs the resulting Javascript file under a ./js folder. Of course, your site probably isn’t comprised of one (and only one) JavaScript file. I actually found it rather difficult to find a Gulp/Browserify example involving multiple files, so here’s one option in an attempt to signal boost the information7:
var gulp = require('gulp'),
	rename = require("gulp-rename"),
	glob = require("glob"),
	browserify = require("browserify"),
	source = require("vinyl-source-stream");

gulp.task('browserify', function(cb) {
    glob('./src/**/*.js', function(err, files) {
        if(!err) {
	        var tasks = files.map(function(entry) {
	            return browserify({ entries: [entry] })
	                .bundle()
	                .pipe(source(entry))
	                .pipe(rename(function (path) {
						path.dirname = path.dirname.replace("src/", "");
					}))
	                .pipe(gulp.dest('./js'));
	        });
		}

		cb(err);
	});
});
Here we use a module called glob to get a list of all JavaScript files under the ./src folder, and send each one to Browserify. We then dump the output into a ./js folder with the same file name. It doesn’t sound like much, but that one little task unlocks the promise of React: we can now put all of our components into their own little .js files, and require them wherever we want to use them — it’s a DRY dream come true8.
We could stop here, but there is one last thing we should do if we’re going to use Gulp as our React gatekeeper. By default, React is set up for a development environment, with a bunch of extra code to help with debugging (which is AWESOME by the way). We don’t really want to carry that baggage into production, though, so we need to strip it out.
All of React’s debug code is behind a check to see what environment it’s running in. Something like:
if (process.env.NODE_ENV !== 'production') {
	console.error('Yo dawg, you messed up!');
}
Turns out that we can use this information to our advantage. If we can change that if statement to:
if ('production' !== 'production') {
	console.error('Yo dawg, you messed up!');
}
… then most JavaScript minification tools will strip out that entire block of code (since the constant production will always equal the constant production).
Gulp makes this task easy if you install a tool called envify along with browserify:
var gulp = require('gulp'),
	rename = require("gulp-rename"),
	envify = require("envify"),
	glob = require("glob"),
	browserify = require("browserify"),
	source = require("vinyl-source-stream");

gulp.task('browserify', function(cb) {
    glob('./src/**/*.js', function(err, files) {
        if(!err) {
	        var tasks = files.map(function(entry) {
	            return browserify({ entries: [entry] })
					.transform(envify)
	                .bundle()
	                .pipe(source(entry))
	                .pipe(rename(function (path) {
						path.dirname = path.dirname.replace("src/", "");
					}))
	                .pipe(gulp.dest('./js'));
	        });
		}

		cb(err);
	});
});

gulp.task('set-prod', function() {
	process.env.NODE_ENV = 'production';
});

gulp.task('default', ['browserify']);
gulp.task('predeploy', ['set-prod', 'default', 'minify-js']);
We now have a default task that will browserify our JavaScript but keep debugging code in place by default. When we’re ready to move to production, then we can run a predeploy task which will trigger envify to do the replacements we discussed earlier. Finally, a minify-js task will strip out all the code that will never be executed.9 Beautiful.
5 Such jargon! Transpilers and preprocessors are essentially the same thing: they convert code written in one language to another so that it can be properly compiled.
6 What it actually “spits out” is a single .js file with all the code from the modules and components you require’d.
7 And here’s another option. I had trouble getting this one to work, but perhaps you’ll have better luck.
8 As opposed to a WET dream?
9 Credit to: http://stackoverflow.com/questions/32526281/how-to-set-react-to-production-mode-when-using-gulp
Conclusion
As I was wrapping up the previous section, I realized just how far down the React rabbit hole I had gone. What started off as an experiment with one component turned into a formal build process for ProjectNom’s CSS and JS.
The outcome was worth it, though. What was once a JavaScript cobbled together with custom interactions and hardcoded behavior is now a self-contained, reusable component. There were certainly a few quirks — most of which I’ve tried to document in this post — but nothing that I would consider a dealbreaker. With this knowledge and experience under my belt, I’m excited by the prospect of converting more of ProjectNom’s brittle JavaScript into components.
Of course, I tumbled down this rabbit hole so quickly that there are some details I only glanced at on the trip down but haven’t had a chance to dig into:
- Stateless Functions: as the name implies, this is a component with no internal state. Its render is simply a pure function of its props.
- Mixins: in React, a mixin is a piece of functionality shared across multiple components. Instead of writing the same functions over and over, you can pull it out as a mixin and just refer to it inside the components that require it.
- shouldComponentUpdate: this is a lifecycle event on a component. By default it always returns true — meaning that any prop or state update triggers the component to render, even if the update contains the exact same data. If you have a quick way of checking whether the data has actually changed, then you can return false instead, and save React some work.
If I uncover anything notable as I use these details, I will be sure to make follow-up posts. In the meantime, feel free to post any comments, questions or corrections in the comments. I’d love to help fellow React newcomers, as well as learn from the experts!
One thought on “ReactJS: What I Learned From My First Component”